Pages

Friday, December 2, 2011

Top Ten Must Haves


Between December 1st and 15th, you can get our Top Ten Holiday Must-Haves at 20% off!  Whether you need stocking stuffers, thank you gifts, or goodies for teachers, co-workers, hostesses or friends, there's something for everyone here!
The promotion begins on December 1st and ends at 11:59pm EST on December 15th, or while supplies last.

Visit my webstore or contact me to place your order.


 Kathy

Tuesday, October 18, 2011

a | s Spotlight - An Autumn Harvest Dinner Party!


Every month A Muse Studio showcases a variety of creative projects featuring a selection of stamp sets paired with a beautiful color palette called A Muse Studio Spotlight.
But what's best of all, you can purchase the October Spotlight stamp sets and Fall Harvest coordinating assorted paper pack at a reduced price from October 15th through November 14th. The Fall Harvest paper pack includes 4 sheets of squash, toffee, orange, currant & french roast (#PASTA11).
Click the link to read more about the October a|s Spotlight and see some gorgeous creations made with the featured stamp sets and color palette. 
Details about this month's spotlight products can be seen on my a muse studio webstore.

Kathy

Monday, October 10, 2011

October Studio Stampers Blog Hop


Welcome to the Studio Sampers October Blog Hop, if you are joining us in the hop you should have come here from Angela's  blog, if not why not start at the beginning with Karen and hop on down until you get back to me.

Here's another Fall card for your viewing pleasure.  I don't think I can get enough of these colors and leaves.  I started out with a Pebble card base and then decided to go with a Cranberry, Pumpkin, Wasabi, and Vanilla Scheme.  I took a piece of Vanilla cardstock and stamped it with the Woodgrain background stamp in Pebble before I stamped the leaves and outlines from Fresh Foliage in Cranberry and Pumpkin and then the smaller leaf from the same set in Wasabi.  I wrapped a couple of pieces of Holiday Washi tape around this piece before  I mounted it on a piece of Cranberry cardstock.  This is popped up on the cardbase with 3d dimensional adhesive.  I die cut a label is cut from Vanilla cardstock with the Labels die before I  stamped it with a Vintage Labels matching outline in Pebble. I stamped off a leaf from Fresh Foliage in Wasabi ink on some scrap paper before I stamped it onto the die cut.  Finally,  I stamped the  sentiment from Contemporary Greetings in French Roast on this die cut before it was mounted on the card front with 3 d foam adhesive.  It probably took me longer to type up this post than it did to actually do the stamping but it's another card that I love that has major "wow" going on without taking hours to complete.
Thanks for visiting and next on the hop is Lisa Chapman, if you get lost, or there is a problem with the link here is the complete list.


Karen Crisp
Angela Schellenberg
Kathy Hatzke  <===========YOU ARE HERE
Lisa Chapman
Kristen Watson
 Veronica Zalis


Supplies
Cardstock:  Pebble, Cranberry, Vanilla
Stamps:  Fresh Foliage, Contemporary Greetings, Woodgrain Background
Ink:  Cranberry, French Roast, Pebble, Pumpkin, Wasabi
Accessories:  Holiday Washi Tape, Vintage Labels Die, 3d Foam AdhesiveKathy

Sunday, October 2, 2011

A Muse|Studio WCMD Challenge: Buttons

I love Fall!  We have Indian Summers here in the Bay Area and generally have our best weather in September and October.  Plus, it's football season and one of my favorite things to do is to hang out and tailgate with family and friends.  There's nothing better on a gorgeous Fall Day.

Besides tailgating and football, I also love the gorgeous colors of Fall.  Yellow and Orange have always been my favorite colors and I love when the leaves turn colors.  This card is my entry into a muse|studio's WCMD Challenge to use buttons on your card.  All supplies are from a muse|studio and can be purchased 24/7 from my webstore.  

Here's the details on the card.  I started out with a Pebble card base and added a piece of Vanilla cardstock which I'd stamped with leaves from Fresh Foliage in Wasabi, Pumpkin, and Currant.  The leaf outlines were stamped after inking the stamped and the solid inner portion was stamped after stamping off on scratch paper once.   I added a strip of Slate Woodgrain cardstock across the center in lieu of ribbon and then topped it off with 3 pumpkin buttons.  The sentiment from Fresh Foliage is stamped on the Pebble portion of the card in Slate ink.  Easy peesy lemon squeezey!  I hear this card--Pebble is such a great neutral color and the autumn leaves make me happy when I look at them.  Thanks for visiting and be sure to come back again real soon.

Supplies
Paper:  Pebble, Vanilla, Slate Woodgrain
Stamps:  Fresh Foliage
Ink:  Wasabi, Currant, Pumpkin, Slate
Accessories:  Pumpkin buttons

Kathy

Sunday, September 18, 2011

A-MUSE-A-PALOOZA Challenge 4: Paris Inspiration

Have you visited a muse|studio's facebook page yet?  If you haven't you should definitely check it out.  They have weekly challenges right now during A-MUSE-A-PALOOZA.  This week's challenge was to create a card that was inspired by a photo of Paris.  I took the greys and greens as well as the trees as the staring point for my inspiration.    

All supplies used are from a muse|studio and can be purchased from my webstore.  The layout for this card is from the Clean and Simple Stamping Blog and is FTL 158.  I started out with a Pebble cardbase and added a couple pieces of Holiday Washi Tape to it for the front strip.  I don't know if I'll be able to make a card that doesn't have Washi Tape--it's addicting.  The focal piece is stamped with images from Spooky Boo Day in Pebble, Wasabi, Slate, and French Roast inks.  I inked up the tree in Pebble ink and then added the Wasabi for the leaves with a sponge dauber to get both colors on the image.  The owl and sentiment are stamped in French Roast.  The bats and grave markers are stamped in slate--the grave markers were stamped off once prior to being stamped on the Sugar Cardstock.  I added some red micro twinkle stickers for a bit of bling before  I rounded the corners and attached this to a piece of Wasabi cardstock that also has rounded corner.  This whole piece is popped up with 3d foam adhesive to the card base.  

There you have it!  I love Spooky Boo Day and will be playing with it a lot more from now till Halloween.  Thanks for visiting.  

Supplies 
Stamps:  Spooky Boo Day
Cardstock:  Pebble, Wasabi, Sugar
Inks:  Pebble, Wasabi, Slate, French Roast
Accessories:  Holiday Washi Tape, Micro Twinkle Stickers, 3d Foam Adhesive Kathy

Saturday, September 10, 2011

September Studio Stampers Blog Hop


Welcome to the a·muse|studio blog hop with my  a·muse "cousins".   We are all lucky to have Krystie as our upline.  You should have come here from Kristen's blog but make sure that you follow all the links to see lots of a·muse|studio goodness.

Dh needed a card for a friend who's recently had a baby. All supplies used are from a muse|studio and can be purchased through my website or by sending me an email.   I couldn't wait to pull out the little crib from Sleepy Sighs and put it to use.  I stamped the crib onto Sugar cardstock in Versafine Onyx Black.  While I love Memento Tuxedo Black and use it 99.99% of the time, I find that the Versafine gives a nice, dark, rich, true black.  I colored in the crib with copics (RV21, RV25, E33, and E29) and spica glitter pens.  I added some Washi Tape from the Spring collection to the piece and tied some sheer onyx organdy ribbon above the tape.  I then stamped the sentiment from Sleepy Sighs onto the piece.  This is layered on a piece of Bermuda cardstock and the focal piece is mounted onto a Blush cardbase with 3d foam adhesive.

There you have it, a quick and cute baby card that will bring a smile to someone's face!

Thanks for visiting and be sure to check out all the rest of the stampers on today's blog hop.  Next up is Karen's blog but if you get lost, here's the complete list of blog hoppers.


Studio Stampers Blog
Krystie Hersch
Kristen Watson
Kathy Hatzke  --------you are here!
Karen Crisp 
Kari Bell 
Lisa Wakabayashi
Veronica Zalis 
Lisa Chapman
Lianna Vigil  


Kathy

Tuesday, August 23, 2011

August Studio Stampers Blog Hop


Welcome to the a·muse|studio blog hop with my  a·muse "cousins".   We are all lucky to have Krystie as our upline.  You should have come here from Krystie's blog but make sure that you follow all the links to see lots of a·muse|studio goodness.

All supplies are from a muse|studio unless otherwise stated and can be purchased from my webstore 24/7.    I'm always in need of thank you cards and when I saw this super cute typewriter in the Just My Type set, I knew I had to have it.   I stamped the typewriter in versamark ink on onyx cardstock and heat embossed it with white embossing powder.  I then carefully cut it out and then cut a tiny slit in the top of the typewriter so that I could put my sentiment through it which is also from the same set.  It's stamped onto sugar cardstock with Memento Tuxedo Black ink.  I added a small heart twinkle sticker to it as well.  The typewriter is popped up with 3-d foam adhesive on a piece of School Lined paper that is punched with a spiral notebook punch.  This piece is put on to a bubblegum polka dot card base.  I added 3 bermuda buttons to the card and there you have it!  A quick, cute, and super easy thank you card to add my stash of cards for a time when I need to show my appreciation to someone.

Now, you're off to Karen's blog.  Here's the complete list of blog hoppers today so that you can feast your eyes on all this a muse|studio goodness.  


Kathy Hatzke  <-------------You are here!

supplies
stamps:  Just My Type
paper:  sugar, onyx, school lined, bubblegum polka dot
ink:  versamark, Memento Tuxedo Black
accessories:  white embossing powder, bermuda buttons, heart twinkle sticker, spiral notebook punch (not a|s)


Kathy

Tuesday, July 26, 2011

Studio Challenge-Kathy

I'm so excited that I'm the Studio Star of the Week.  One of my favorite techniques is  masking because it’s one of those relatively simple techniques that gets a big wow.  You can add depth to your stamping, frame an image, fill in images, and even selectively use parts of your stamps to get more mileage out of them.  My challenge to you is to create a card using the masking technique and then share it at the Studio Stampers blog-it can be basic masking, reverse masking, or even masking a part of your stamp.  The only thing you need to do is use some type of masking on your card.

Here's my sample.  All supplies are from a muse|studio and can be purchased from my web store.  I stamped the Marigolds from Marvelous Marigolds on a kraft cardbase in Cherry and also stamped them on some eclipse masking tape that I've had forever in Memento Tuxedo Black.  I cut out the Marigolds from the masking tape and used them to cover up the Marigolds on my cardfront.  I then stamped the Woodgrain background stamp over the card front in French Roast and some leaves from Marvelous Marigolds in Grass.  I removed my masks and added a label that I had die cut from Cherry cardstock and stamped with the matching outline from Vintage Labels on the cardfront with 3d foam adhesive.  The sentiment from Contemporary Greetings is stamped on a piece of Sugar cardstock with French Roast ink and mounted onto the label.  Finally, I lightly sponged the center of the Marigolds with Sugar ink and added a couple Vanilla Pearl stickers to the centers of the flowers.  There is about as close to a one layer card as you'll get from me!

I love how all the masking and layering on of stamps and images adds so much depth to this card.

Thanks for visiting and be sure to come back soon to let me know you played in the challenge.  I can't wait to see what you create.

Supplies
stamps:  Marvelous Marigolds, Vintage Labels, Contemporary Greetings, Woodgrain background
paper:  kraft, cherry, sugar
ink:  cherry, french roast, sugar, grass
accessories:  vanilla pearl stickers, labels die
 Kathy

Monday, July 25, 2011

Studio Star of the Week

Have you seen it?  I'm the Studio Star of the Week.  Be sure to check out my challenge and come back here for a step by step on the card I made.

Kathy

Tuesday, July 19, 2011

Studio Challenge-Ronnie


Have you checked out Studio Stampers?  We're a team of a muse|studio consultants who all share the wonderfully talented Krystie Hersch as our upline.  Last week, Ronnie, was the Studio Star of the week and had a lovely inspiration challenge for us.  Fortunately, Krystie has decided to keep the challenges open for two weeks and I got some time to play along.  My card is inspired by the lovely pink table and vase in the upper left as well as the gumballs/candy on the right.  


 All supplies used are from a muse|studio and can be purchased from my web store.  I stamped the gumball machine from Sweet Love on sugar  and sage cardstock with Memento Tuxedo Black and colored in the gumballs and heart with several pink and green Copics, paper pieced the gumball machine, and then went over the heart and parts of the gumball machine with a clear Spica glitter pen for a hint of subtle shimmer.  Hello is from Just My Type and is also stamped with Memento Tuxedo Black ink.  This piece is layered on  sage cardstock.  I added a piece of Washi tape from the summer assortment and sugar polka dot organdy ribbon before I popped the focal piece up on 3d foam adhesive.

There you have it!  If you've got some time, come visit and play along.  There's a new Studio  Star and challenge this week and I'm hoping to find some time to play along again.

Thanks for visiting and come back soon.

Supplies
stamps:  Sweet Love, Just My Type
paper:  sugar, bubblegum, sage
ink:  Memento Tuxedo Black
accessories:  Copic Markers, Spica Glitter Pen, Summer Washi Tape Assortment, Sugar organdy polka dot ribbon  

Kathy

Sunday, July 10, 2011

July Studio Stampers Blog Hop


Welcome to the a·muse|studio blog hop with my  a·muse "cousins".   We are all lucky to have Krystie as our upline.  Today, I'm first on the blog hop but make sure that you follow all the links to see lots of a·muse|studio goodness.

Dh needed a card for his grandfather and I wanted something elegant, simple, and appropriate for an older gentleman.  It's really hard for me to not pull out some bling or glitter  so this was definitely a challenge for me.  I love how this one turned out and think I might have to challenge myself to work on some more masculine, bling free cards in the future.

Here are the details on the car.  All supplies used are from the a·muse|studio spotlight and can be purchased through my a·muse|studio store.  I started out with a lichen card base and stamped the little coral stamp from Sea Shells on the card base in versamark across the middle.  It's really hard to see but so subtle and nice in real life.  The sea shells and star fish from the Sea Shells  set are also stamped in versamark on kraft, embossed in white embossing powder and then cut out.  I stamped "Papa" from the Classic Alphabet  set in Bermuda ink on Sugar cardstock.  I tore a piece of sage cardstock and attached it to this piece and then tied on some toffee twine to this piece and attached it to the card front.  The cut out pieces are attached to the front with 3d foam adhesive.  There you have it!  An elegant, simple summer card that can easily be adapted for the recipient since you're using alphabet stamps for the focal piece.  

supplies used:
stamps:  sea shells, classic alphabet
paper:  lichen, sage, kraft, sugar
ink:  bermuda, versamark
accessories:  white embossing powder, toffee twine 


Thanks for stopping, now you are off to Karen Crisp's blog 
Here's a complete list of the blog hop:


Kathy

Tuesday, June 28, 2011

Have a Whale of a Day


So, it's June 28th and we're expecting rain and drizzle in the Bay Area.  Can I please just get some summer?  We didn't have Spring since it rained virtually every day. We have had some pleasant weather but can it be consistent? Waaaaaaah!

Enough whining from me.  I'm on break so I should be happy, right?  I'm transitioning between jobs right now--I left my former school/district and will be working in the school/district very close to where I now live.  Exciting times!  Of course, we went by my new school yesterday and the kids saw that the start time is earlier than where they currently go so they informed me that they really need to go to the school where I work. . .While it was convenient in so many ways, it's actually better for them to not have me as their principal.  It's better for me to just be mommy to them.

Are you done listening to my chit chat?  You came for a card, right?  Today's card is made using supplies from the a|s Elegant Summer Spotlight and can be purchased in my a muse|studio store.  I adore these colors and images--perfect for summer!  Here are the deets--I stamped the leafy image, fish, and bubbles from Keep Swimmin' in lichen, sky, and bermuda on sugar cardstock  and then added some clear twinkle stickers over the bubbles.  The sentiment from the same set is stamped in Memento Tuxedo Black near the bottom of the focal piece.  The little fish is also stamped on sugar cardstock with Memento Tuxedo Black and then colored in with Copics, cut out, and mounted on 3D foam adhesive.  The focal piece is matted on sage cardstock.  The entire piece is popped up on 3D adhesive on a bermuda cardbase that has a strip of lichen cardstock added to it.  There you have it, easy, peasy, lemon squeezey!  This card is perfect for so many occasions and it happened to go to our neighbor's son for his birthday.

Thanks for vising and be sure to come back again soon.

Supplies used:
Stamps:  Keep Swimmin'
Paper:  Sugar, Bermuda, Lichen, Sage
Inks:  Bermuda, Lichen, Sky, Memento Tuxedo Black
Accessories:  Copics, Clear Twinkle Stickers, 3D foam adhesive

Kathy

Sunday, June 19, 2011

a muse|studio Elegant Summer Spotlight

Those of you who know me know that I simply adore a muse|studio.  Every month from the 15th-15th, you'll receive a 10% discount on selected stamps and papers. And as you can see, you'll also get a ton of amazing inspiration. 

 The Seaglass Assortment Pack contains four sheets of each of the following colors of cardstock:
  • Bermuda
  • Sky
  • Sage
  • Lichen
  • Latte 
Be sure to check out my a muse|studio website for more ideas and inspiration using the spotlight sets and to place an order.

School has wrapped up and I'm wrapping up some odds and ends before I get my summer break and more glorious time to stamp.  I'll have some goodies to show you later this week using some of the Elegant Summer Spotlight items.

Thanks for visiting!


Kathy

Wednesday, June 15, 2011

a muse|studio spotlight

Have you all seen this? Every month selected stamp sets will share the spotlight on the a muse|studio website with a gorgeous color palette to create projects that showcase the versatility of paper crafting.


For one month, you can save 10% on the stamp sets used to create these fabulous projects!

Classic Alphabet
Sea Shells
Keep Swimmin’
Life’s a Breeze
Mad for Plaids

And, for a limited time, order the special Seaglass cardstock assortment pack - an easy way to get the look showcased in this month's spotlight.

Seaglass Assortment Pack contains four sheets each:

Bermuda
Sky
Sage
Lichen
Latte

You can order these products as well as anything else that catches your eye through my webstore.  Be sure to contact me prior to placing an order if it is going to be $150 or higher so that you can take advantage of hostess benefits.  Don't forget to check back because I'll be showcasing the versatility of these stamp sets and gorgeous colors over the next month.


Kathy

Friday, June 10, 2011

Studio Stampers June Blog Hop


It's time for the Studio Stampers June Blog Hop. Once a month, Krystie Hersch and her downline will be showcasing projects made with a muse|studio products.  Krystie will able be selecting one person who comments on one of the blog posts to win some a|s goodies.  Be sure to visit everyone and give them some love for your chance to win.  

 You should have come here from Ronnie's Blog but if not, feel free to go back to the beginning and start at Krystie's blog so that you don't miss out on any a|s inspiration.

Can I just tell you that I absolutely love the card that I'm sharing with you today?  The picture doesn't do it justice and I really wanted to just keep this one for myself and not send it away.  I stamped the flowers from Marvelous Marigolds in lemon whip and blackberry onto  sugar cardstock.  This is mounted onto a blackberry cardbase.  The sentiment from Contemporary Greetings was stamped onto vellum cardstock with blackberry ink and then embossed with clear embossing powder and then I cut the notch onto the ends with scissors.  I layered this on top of a piece of washi tape from the Fall collection on the front of the card.  I added a blackberry button on top of the sentiment tag to cover up the bit of adhesive used to attach it to the card.  To finish it off, I added some sugar pearl stickers to the centers of the blackberry marigolds and then randomly on the focal piece as well.  Tah Dah!  Simple and stunning!

Thanks for visiting and be sure to come back soon.  There's going to be some exciting a|s news on June 15th and I'll be showcasing some of the products that will be highlighted for the month.

Your next stop on the hop is Kelly Spivey's blog but in case you get lost, here's the list of all the blog hop participants in order.  

Krystie Hersch http://www.cleanandsimplecards.com
Lianna Vigil  http://llamatales.blogspot.com/
Kellie Maggio  http://iscrapyouscrap.blogspot.com/
Kari Bell http://karikards.blogspot.com
Kristen Watson  http://branchandsky.blogspot.com
Veronica Zalis  http://lk2thestarz.blogspot.com
you are here----->Kathy Hatzke  http://www.kathatstamps.blogspot.com
Kelly Spivey  http://www.southpawpaperarts.com
Lisa Wakabayashi http://dragonfliesandcats.blogspot.com
Karen Crisp http://www.papernstamps.blogspot.com
Kristie Hartfeil  http://krismybliss.wordpress.com
Angela Schellenberg  http://gypsypaperie.blogspot.com
Heather Wroe  http://wroedeo.blogspot.com
All supplies are from a muse|studio and be purchased through my webstore.  
stamps:  marvelous marigolds, contemporary greetings
paper:  sugar, blackberry, vellum
ink:  blackberry, lemon whip
accessories:  fall washi tape, blackberry buttons, sugar pearl twinkle stickers
Kathy

Sunday, May 15, 2011

Clever Girls OLC

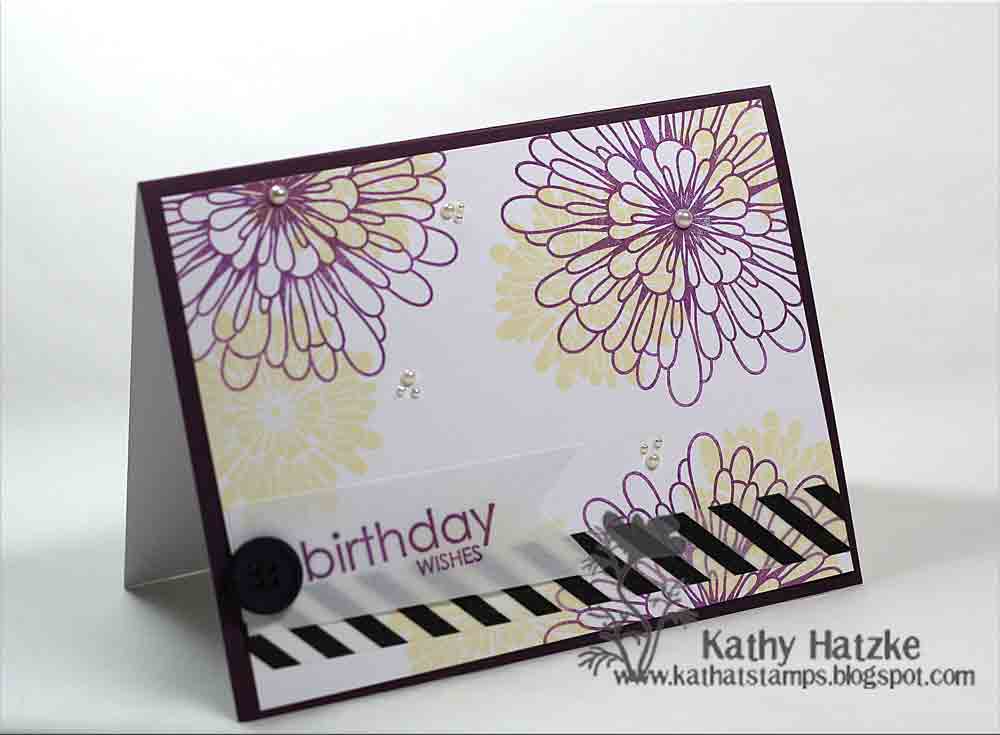
I think this may be one of the first one layer cards that I 've made that I'm actually pretty happy with.  One layer cards are really, really difficult for me to make.  I don't know why since when you go to buy a card, 9 times out of 10, it's a one layer card.  I actually was about to get rid of those one until dd told me to add some "diamonds" to the flowers and you know what?  She was right!
All supplies are from a muse|studio and can be purchased from my webstore 24/7.  Be sure to contact me if your order is going to be $150 so that you can earn hostess benefits.
Stamps:  clever girls, contemporary greetings, vintage labels
paper:  sugar
inks:  apricot, bermuda, ocean, memento tuxedo black
accessories:  summer washi tape, clear twinkle stickers


Kathy

Monday, May 2, 2011

FS221


It's been awhile since I've played in the Featured Stamper challenge over at SCS but when I saw that the FS was Susan, AKA LateBlossom, I knew I had to play along.  I've been a fan of Susan's work for quite some time.  She is the Queen of Clean and Simple as well as doing an amazing job of embracing the white space.  This was a challenge for me and I've never done a white on white card before but I love how it turned out. 

All supplies are from a muse|studio and be purchased at my webstore 24/7.  Don't forget that if your order is more than $150, contact me directly so that you can get your hostess benefits.

Susan made two cards with the same layout and different colors and shared them on her blog.  I love how the vibrant colors just pop off the white.  I will say, I'm still scared of the white space and had a few choice words to share when I got a fingerprint on the top of my card.  My 6 yo suggested I just erase it--if it were only that simple, right?  I did carefully wipe at it with a baby wipe and got it off but the card is a little messed up where I wiped it off.  It's barely noticeable but bothers me especially since I was already done and admiring my handiwork.

Since I already had a bunch of stuff out, I decided to give a one layer card a try--that was a challenge and you'll have to come back soon to see how it turned out :-)

Thanks for visiting!

stamps:  clever girls
paper:  sugar
ink:  blush, bubblegum, papaya, orange, bermuda, ocean, slate

Kathy

a muse|studio mega blog hop


Welcome to the a muse|studio consultants mega blog hop.  If you are participating in the blog hop, you should have come from Nancy's blog and if not, then you should start from the beginning with Samantha's blog until you come to my blog.

I absolutely love the tini time stamp set and can see so many great uses for it.  This layout was inspired by one that I saw on on Stephanie's blog.  Here are the details on my simple but fun card :-)  All supplies are from a muse|studios and can be purchased through my webstore

I added some washi tape from the summer collection onto a sky card and then adhered a piece of sugar cardstock that was stamped with the circles from tini time in bermuda ink.  Then I stamped the sentiment from tini time with bermuda ink onto the cardfront and added some twinkle stickers under the word thanks.  The martini glass was stamped with Memento Tuxedo Black unto sugar cardstock and then filled in with the triangular block from the same set with lime ink.  The cherry was stamped with cherry ink on the drink and then I added some diamond glitter on the rim of the glass.  Appletinis, anyone?  I cut out the drink and added it the the card front with 3D foam adhesive.  There you have it--easy peasy, lemon squeezey--a fun thank you card in a short time that packs a big wow.

Thanks for visiting. Now on to your next stop Katie's blog.  

Kathy

Sunday, May 1, 2011

Studio Stampers May Blog Hop

Welcome to the Studio Stampers May Blog Hop.  The amazing Krystie Hersch and her downline are hopping along today to show you all sorts of a muse|studio goodness.  If you're interested in any of the products needed to make any of the samples shown in the hop, be sure to visit my a muse|studio store.  

For my card, I decided to get a little cutesy and do some coloring and paper piecing.  I love all the dimension on this card and this layout is sure to be one of my faves that you'll see quite often.  I added a piece of french roast gingham to a kraft card base and then rounded the corner of the card with my Corner Chomper.  Then I cut a piece of sugar and grass card stock with my Circle Nestabilites--I've forgotten how fun the classic shapes could be and I'll be pulling out my circles, squares, and rectangles a lot in the near future.     I stamped an oval from ovalicious onto the sugar circle in grass ink for the ground.  The tree from woodland friends was stamped onto french roast and sage polka dot cardstock .  The leaves of the tree were popped up with 3D foam adhesive.  The hedgehog from friends fur-ever was stamped onto sugar cardstock with Memento Tuxedo Black and then colored in with Copic Markers before being cut out and placed near the tree on 3D foam adhesive. I had to color her flower in with a Clear Spica Glitter pen for a little bit of bling even though this card has pretty neutral and subdued colors :-) The sugar circle was adhered to the grass circle with Tombow Mono Aqua glue and then adhered to the cardfront.  Finally, the sentiment from woodland friends was stamped on the front of the card with french roast ink.

Thanks for visiting! 

Your next stop is Kelly Spivey.  

If you get lost, here is the complete list:


Kathy Hatzke -you are here

supplies
stamps:  friends fur-ever, ovalicious, woodland friends
paper:  french roast, grass, kraft, sugar, french roast gingham, sage polka dot
ink:  french roast, grass, Memento Tuxedo Black
accessories:  3D foam adhesive, Circle Nestabilites, Copic Markers (E51, E55, E57, E59, RV14), Clear Spica Glitter pen


Kathy

Thursday, April 21, 2011

Tuesday Trigger Time


When I saw the Tuesday Trigger over at Moxie Fab World this week, I knew I had to play along.  I'm a sucker for flowers :-)  Here's my take on it.  I used the colors and flowers for inspiration and wanted to make a soft, pretty, and feminine card.  

All supplies are from a muse|studio.  I think that just because is probably my favorite stamp set right now.  I keep reaching for it and I love everything I do with it.  It's seriously my go to set right now and I have to remind myself that I really do own other stamp sets.  Here's the deets.  I die cut a piece of vanilla cardstock with a Spellbinders Nestablility Labels Four die.  I then stamped the mesh background with latte ink over the die cut and then stamped the leaves and flowers from just because in lichen, apricot, and lemon whip over the background.  I highlighted the leaves and flowers with a clear Spica glitter pen for a bit of shimmer.  The butterfly is a piece of shell cardstock which is die cut with one of the butterflies from the butterflies trio die.  I colored a few pearl twinkle stickers with an RV95 Copic and attached them to the butterfly body.  The butterfly is adhered with a little bit of Tombow Mono Aqua on just the body so that the wings can fly free.  I attached a piece of lemon whip cardstock to the latte woodgrain cardbase, stamped the sentiment from just because in french roast, added a piece so washi tape from the spring collection. and then adhered the focal piece on the card with 3d foam adhesive.  I looked at it and it needed a little something else so I rounded the bottom corners of the card with my corner chomper.  Voila!  A card with a few of my current faves:  stamp set, washi tape, rounded corners, and sparkle.  What's not to like?

Thanks for visiting and be sure to come back soon!

Supplies
stamps:  mesh background, just because
paper:  latte woodgrain, lemon whip, vanilla
ink:  latte, lichen, lemon whip, apricot, french roast
accessories:  spring collection washi tape, butterfly trio dies, Spellbinders Labels Four Nestabilities, Clear Copic Spica Glitter pen, Pearl Twinkle Stickers, RV95 Copic marker
Kathy

Sunday, April 17, 2011

You're a Rock Star

My little ones went to a birthday party the other day and here's the card I made for the birthday boy.  All supplies are from a|s unless otherwise stated.  I {heart} this stamp set which is called rock star.  It's going to be getting a lot of use in my house :-)  This one's pretty simple but I absolutely love it.  This color combo might be one of my new favorite combos and I'm sure you're going to be seeing it some more in the very near future.  It's hard to see in this picture but the wings and stars have Rock Candy Distress Stickles on them.  It's a nice way to add something without making it too blingy and taking away from the boy factor.

Since I've had the chance to play around with my a|s inks lately, can I just tell you how much I love them?  They're a pigment ink but they actually dry fairly quickly and are very similar to chalk inks once dry.  I love how you can layer them on each other and they're still somewhat opaque plus the colors are just gorgeous.

Thanks for visiting and be sure to come back soon!

stamps:  rock star
paper:  orange, bermuda, sugar
ink:  orange, bermuda, ocean, memento tuxedo black
accessories:  Rock Candy Distress Stickles
Kathy

Thursday, April 14, 2011

Vintage Clever Girls


Here's another card made with the clever girls stamp set.  I'm going to have a lot of fun playing with this set and love how you can get so many different looks from it. All supplies are from a|s.

I attached a piece of onyx vintage cardstock to the onyx cardbase and then stamped the images with blackberry, blush, and slate into onto a piece of vanilla cardstock.  I stamped and die cut  the label with a vintage label die with one of the matching images from vintage labels in sugar ink.  The sentiment is also from clever girls.  I added some clear twinkle stickers that were colored with a black copic marker and then punched a hole in one side of the label and threaded some slate stitched grosgrain ribbon through it.  The label is attached to the cardfront with 3d foam adhesive.

Thanks for visiting and be sure to come back soon!

stamps:  clever girls, vintage labels
paper:  onyx, blackberry, vanilla, vintage onyx 
ink:  blackberry, slate, blush, sugar
accessories:  clear twinkle stickers, slate stitched grosgrain, vintage labels dieKathy

Tuesday, April 12, 2011

Clever Girls

This originally started out as a one layer card inspired by one that Nichole Heady made.  But, I screwed it up because when I stamped the sentiment over the circles and flowers, you couldn't really see it.  Sooooooo, I decided to cut the card in half and use the other side to stamp the circles and flowers.  After I stamped them, I decided they'd look better in the top left of the card instead of the bottom right so I flipped it, punched out some holes in the center of the circles with my crop a dile,  stamped the sentiment, adhered some washi tape under the sentiment, die cut and glittered a swallow and popped that up on 3 d foam adhesive.  Then I rounded the corners of this piece and the card base with my corner chomper and mounted it with 3 d foam adhesive.  The colors were picked by my 6yo dd and this card is going to go to her one day :-)  Unless I decide to keep it for myself since I think it's pretty darn cute.

All supplies are from a|s.  Feel free to click the link in my sidebar for my a|s store to purchase the supplies needed to make this card.

Stamps:  clever girls
Paper:  blush, lime, bubblegum
Ink:  lime, bubblegum, memento tuxedo black
Accessories:  a|s dies set swallows, diamond glitter, washi tape-summer collection

Thanks for visiting and be sure to come back soon.  I've got another card with the same stamp set that has a totally different look to share.

Kathy

Sunday, April 10, 2011

Just Because

Here's a card I made for my oldest son's grandma.  She just had knee surgery and came home from the hospital.  I love the simplicity of this card and how it all came together.

All supplies are a muse|studio.  I stamped the leafy image onto sugar cardstock in sage and stamped off twice.  The flower is stamped in blush ink on the cardfront.  I stamped the sentiment in french roast and then added some washi tape from the Spring collection, sage gingham cardstock, and bubblegum buttons.  This piece is matted on sage cardstock and then put on a blush card base.  My dd wanted me to add some glitter and the butterfly from the set but I decided to embrace some white space and keep it simple.

Thanks for visiting!

stamps:  just because
cardstock:  blush, sage, sugar, sage gingham
ink:  blush, sage, french roast
accessories:  spring collection washi tape, bubblegum buttons

Friday, April 8, 2011

Dude, You Rock!

I had a little time to play around with some of my a muse|studio goodies and came up with this one.  Masculine/Boy cards are always a little difficult for me but I think this one might work.  With a 12 year old and soon to be 9 year old, I think this set might be getting a lot of use in my house hold.  I'm going to play around with this set some more and some different colors so be sure to check back and let me know what you think.


The card is pretty self explanatory and all supplies used are from a muse|studio.  The wings and flagged sentiment piece are popped up with 3d foam adhesive


Stamps:  Rock Star
Cardstock:  Kraft, Buttercup, Blackberry, Vanilla
Inks:  Buttercup, Lichen, Blackberry

Thanks for visiting and be sure to come back soon!

Blog Widget by LinkWithin